
Sign up for our newsletter
Subscribe to our emails

Hobby Round: Super Fine Basing Grit Information Basing Grits are used to represent all sorts of dirt, sand, rubble or debris. A note on our basing grit: All Gale Force Nine basing grit is made from a porous organic material rather than sand or other minerals. This organic material absorbs glue and paint, insuring that everything stays where you want it. When using sand (or kitty litter or any other mineral), paint and glue tend to flake off over time.
£3.50

The Warhammer Colour Tool Set gives you the basic tools you need to remove components from frames and clean up any mould lines before assembling your miniatures. Designed to be simple to use with helpful features, they are ideal for any new Warhammer hobbyist.This set includes a pair of Starter Clippers and a Starter Mouldline Scraper. The rubberised grip and spring-loaded handles on the clippers will reduce hand strain, while the mouldline scraper is sized perfectly to get into tight spaces around your miniatures.
£12.50 £11.30
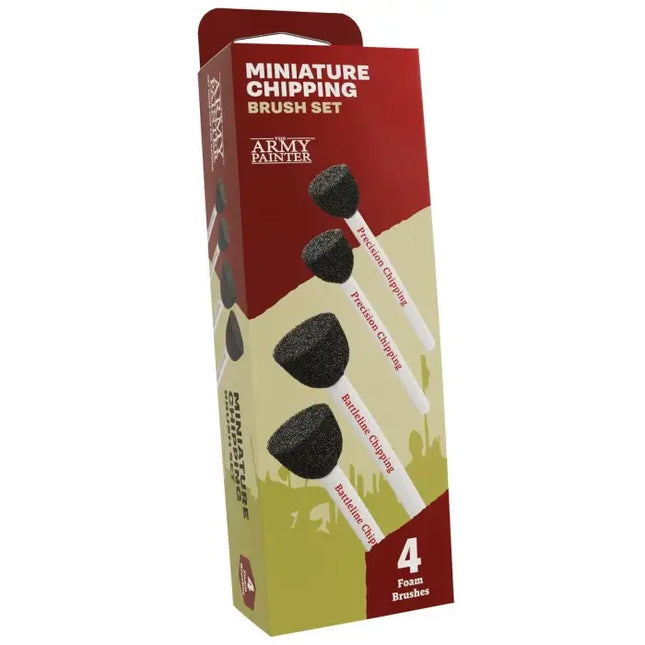
The ideal tool for adding detailed weathering effects to your miniatures! Designed in two versatile sizes that make creating scratches, worn leathers, and rusty armour panels a breeze. The tips can be cut to different shapes for more precision. Please Note: One Miniature Chipping Brush Set is supplied.
£7.00 £6.30

£2.70
£4.45 £4.00
£5.50 £5.00
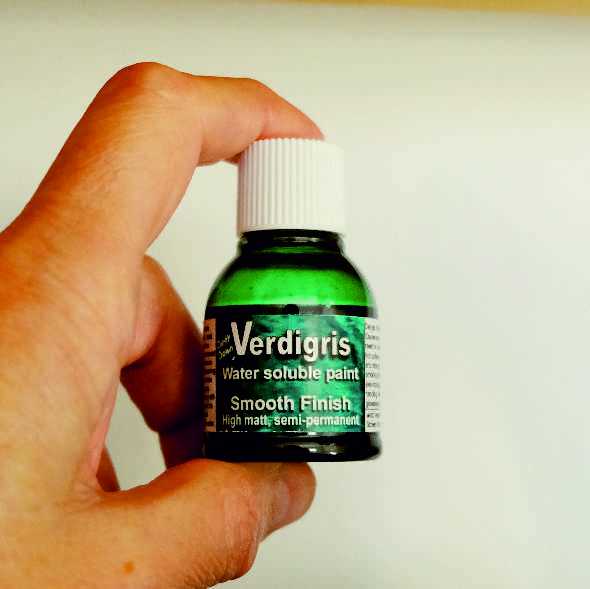
The dark coloured liquid dries to a high matt verdigris colour in 1 to 5 minutes depending on the temperature. Apply verdigris paint by brush or airbrush/sprayer. Verdigris effect paint looks best when applied to rough, textured surfaces. Usage Instructions: The pot and surface should be at room temperature or warmer before use. The verdigris colour may not appear if the pot and/or the surface are very cold. The mixture will settle on the bottom of the pot. It’s very important to thoroughly shake the pot with the ball bearings rattling before each and every use. Thoroughly stir the mixture and ensure that solids on the bottom of the pot are fully mixed into the liquid. Repeat stirring and shaking until all lumps have gone. It’s much better to shake and stir verdigris paint when the pot is at room temperature or warmer. If the pot is cold it may not be possible to fully mix any solids into the liquid. Use verdigris paint straight from the pot. Replace the lid quickly during use to prevent the liquid from evaporating or decant what you need to use for a job into a separate smaller pot/container with a lid. Do not add water into the paint pot – this may prevent the colour from forming. Ensure surfaces are clean, dry and grease free. Test the paint on hidden surfaces before use to ensure compatibility and adhesion. Only apply to non-porous surfaces such as plastic and metal. Do not apply to porous/absorbent surfaces such as bare timber or paper. Verdigris paint can be applied to painted surfaces, but test first. If the effect does not form, try first sealing the surface with varnish. Verdigris paint is water soluble and the effects of painting will be lost by washing in water or by getting wet, but there may still be staining. Do not expose verdigris paint to rain or splashing with water. Verdigris paint looks best when applied to a rough surface. To fill dents and grooves in surfaces, first cover the surface with verdigris paint, and then wipe the paint off the raised areas with a damp cloth (at an angle to the grooves), leaving some of the paint trapped. The wetter the cloth, the more paint removed. When fully dry, verdigris paint can be made more permanent by spraying with fine/mist coats of acrylic varnish/lacquer. Test varnish first because types of varnish change the colour/shade of the paint. When dry, avoid scuffing/scratching the finished paintwork. For the best results it’s best to practise different techniques listed below before final use. To darken the shade apply more coats. Allow each coat to fully dry before applying another. Any number of coats of verdigris paint can be applied over the top of each other. For a broken, patchy effect apply to small areas/patches at a time and allow to dry – more in some areas, less in others. The shade will vary depending on the quantity applied. A thick coat of paint will dry a darker shade, and a thin coat of paint will dry a lighter shade. Further variations in shade can be created by dabbing a damp or wet brush, cloth or tissue onto the painted surface and then leaving to dry. As the water dries, the dye in the paint separates into shades of light and dark verdigris. The more water used, the greater the effect. This technique can be used after the paint has dried or while it is still wet. Another option is to simply splash water onto the verdigris paint and leave to dry – without dabbing. For a very dark shade, decant a small amount into a separate pot and allow the paint to evaporate. The more the paint evaporates, the thicker and darker the paint gets (may not be possible to spray if too thick). Brush Application Dip the brush and immediately apply to the surface. For a patchy effect dab the paint onto a surface and keep dabbing in the same place until the paint dries. Any number of coats can be applied in this way. For a more even effect paint an even coat onto a surface. A different verdigris effect is obtained depending on whether a soft or stiff brush used to apply the paint. Fine Soft Brush: For very detailed work. Apply a small amount to the brush and apply directly to the surface. Larger Soft Brush: For apply larger amounts to larger areas. For a darker shade apply larger quantities and for lighter shades apply smaller quantities. Stiff Brush: Very light shades can be obtained by dabbing a very small quantity of verdigris paint onto a surface using a stiff brush. Allow verdigris paint to dry slightly on the brush for a very light effect, similar to the “dry brushing” painting technique. Always clean the brush in water straight after use. Do not let verdigris paint fully harden onto brush. If for any reason verdigris paint has dried onto a brush, soak the brush in methylated spirits to fully clean, (but check first that this will not damage the brush). Cloth/Tissue Application Pour on a cloth or tissue and dab onto a surface and keep dabbing in the same place until the paint dries. For a light shade apply a small amount at a time. For a darker shade apply a larger quantity. Spray Application Spray verdigris paint onto a surface straight from the pot using an air brush or pressure pot spray gun. Clean air brush immediately after use. Verdigris Effect is water soluble. Verdigris Effect can be wiped off surfaces in two ways (even when fully dry): Using a damp cotton bud. Only dampen one end of the cotton bud. Wipe verdigris paint with the damp end first, and then with the dry end. The wetter the cotton bud, the more verdigris paint is removed. Using a sheet of kitchen roll (absorbent paper towel). First apply verdigris paint onto the panels so that they are fully covered, and leave to dry. Flatter one end of a piece of kitchen roll, and dip this end into water. Remove most of the water from the flat end so that it’s only slight damp. This can be done by pushing the flat end against other dry pieces of kitchen roll. Gently press the damp flat end of kitchen roll against the dried verdigris paint, and twist the kitchen roll. Keep the kitchen roll in one place, do not wipe side to side across the surface. Some verdigris paint is left on the model and some removed. Some verdigris paint will have been wetted by the damp kitchen roll and will change shade to look darker, just like old verdigris. The wetter the verdigris paint gets, the darker the shade. Practice first to check how damp the kitchen roll should be and how much pressure to apply. Create different shades of verdigris using water: Apply verdigris paint to a surface. Apply a small amount of water to the verdigris paint and either allow to dry on its own, or dry by dabbing with a piece of kitchen roll or tissue. This usually causes the colours to separate and dry different shades and more patchy. Water can be applied to the surface after the verdigris paint has fully dried or when the verdigris paint is still wet.
£8.50 £7.80
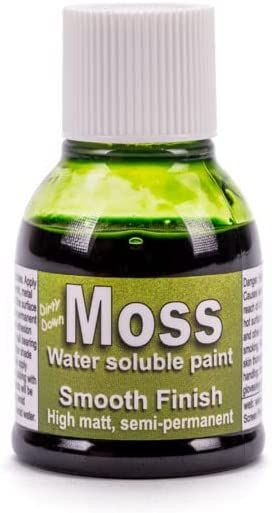
The dark coloured liquid dries to a high matt moss colour in 1 to 5 minutes depending on the temperature. Apply moss paint by brush or airbrush/sprayer. Moss effect paint looks best when applied to rough, textured surfaces. Usage Instructions: The pot and surface should be at room temperature or warmer before use. The moss colour may not appear if the pot and/or the surface are very cold. The mixture will settle on the bottom of the pot. It’s very important to thoroughly shake the pot with the ball bearings rattling before each and every use. Thoroughly stir the mixture and ensure that solids on the bottom of the pot are fully mixed into the liquid. Repeat stirring and shaking until all lumps have gone. It’s much better to shake and stir moss paint when the pot is at room temperature or warmer. If the pot is cold it may not be possible to fully mix any solids into the liquid. Use moss paint straight from the pot. Replace the lid quickly during use to prevent the liquid from evaporating or decant what you need to use for a job into a separate smaller pot/container with a lid. Do not add water into the paint pot – this may prevent the colour from forming. Ensure surfaces are clean, dry and grease free. Test the paint on hidden surfaces before use to ensure compatibility and adhesion. Only apply to non-porous surfaces such as plastic and metal. Do not apply to porous/absorbent surfaces such as bare timber or paper. Moss paint can be applied to painted surfaces, but test first. If the effect does not form, try first sealing the surface with varnish. Moss paint is water soluble and the effects of painting will be lost by washing in water or by getting wet, but there may still be staining. Do not expose moss paint to rain or splashing with water. Moss paint looks best when applied to a rough surface. To fill dents and grooves in surfaces, first cover the surface with moss paint, and then wipe the paint off the raised areas with a damp cloth (at an angle to the grooves), leaving some of the paint trapped. The wetter the cloth, the more paint removed. When fully dry, moss paint can be made more permanent by spraying with fine/mist coats of acrylic varnish/lacquer. Test varnish first because types of varnish change the colour/shade of the paint. When dry, avoid scuffing/scratching the finished paintwork. For the best results it’s best to practise different techniques listed below before final use. To darken the shade apply more coats. Allow each coat to fully dry before applying another. Any number of coats of moss paint can be applied over the top of each other. For a broken, patchy effect apply to small areas/patches at a time and allow to dry – more in some areas, less in others. The shade will vary depending on the quantity applied. A thick coat of paint will dry a darker shade, and a thin coat of paint will dry a lighter shade. Further variations in shade can be created by dabbing a damp or wet brush, cloth or tissue onto the painted surface and then leaving to dry. As the water dries, the dye in the paint separates into shades of light and dark moss. The more water used, the greater the effect. This technique can be used after the paint has dried or while it is still wet. Another option is to simply splash water onto the moss paint and leave to dry – without dabbing. For a very dark shade, decant a small amount into a separate pot and allow the paint to evaporate. The more the paint evaporates, the thicker and darker the paint gets (may not be possible to spray if too thick). Brush Application Dip the brush and immediately apply to the surface. For a patchy effect dab the paint onto a surface and keep dabbing in the same place until the paint dries. Any number of coats can be applied in this way. For a more even effect paint an even coat onto a surface. A different moss effect is obtained depending on whether a soft or stiff brush used to apply the paint. Fine Soft Brush: For very detailed work. Apply a small amount to the brush and apply directly to the surface. Larger Soft Brush: For apply larger amounts to larger areas. For a darker shade apply larger quantities and for lighter shades apply smaller quantities. Stiff Brush: Very light shades can be obtained by dabbing a very small quantity of moss paint onto a surface using a stiff brush. Allow moss paint to dry slightly on the brush for a very light effect, similar to the “dry brushing” painting technique. Always clean the brush in water straight after use. Do not let moss paint fully harden onto brush. If for any reason moss paint has dried onto a brush, soak the brush in methylated spirits to fully clean, (but check first that this will not damage the brush). Cloth/Tissue Application Pour on a cloth or tissue and dab onto a surface and keep dabbing in the same place until the paint dries. For a light shade apply a small amount at a time. For a darker shade apply a larger quantity. Spray Application Spray moss paint onto a surface straight from the pot using an air brush or pressure pot spray gun. Clean air brush immediately after use. Moss Effect is water soluble. Moss Effect can be wiped off surfaces in two ways (even when fully dry): Using a damp cotton bud. Only dampen one end of the cotton bud. Wipe moss paint with the damp end first, and then with the dry end. The wetter the cotton bud, the more moss paint is removed. Using a sheet of kitchen roll (absorbent paper towel). First apply moss paint onto the panels so that they are fully covered, and leave to dry. Flatter one end of a piece of kitchen roll, and dip this end into water. Remove most of the water from the flat end so that it’s only slight damp. This can be done by pushing the flat end against other dry pieces of kitchen roll. Gently press the damp flat end of kitchen roll against the dried moss paint, and twist the kitchen roll. Keep the kitchen roll in one place, do not wipe side to side across the surface. Some moss paint is left on the model and some removed. Some moss paint will have been wetted by the damp kitchen roll and will change shade to look darker, just like old moss. The wetter the moss paint gets, the darker the shade. Practice first to check how damp the kitchen roll should be and how much pressure to apply. Create different shades of moss using water: Apply moss paint to a surface. Apply a small amount of water to the moss paint and either allow to dry on its own, or dry by dabbing with a piece of kitchen roll or tissue. This usually causes the colours to separate and dry different shades and more patchy. Water can be applied to the surface after the moss paint has fully dried or when the moss paint is still wet.
£8.50 £7.80
£2.70
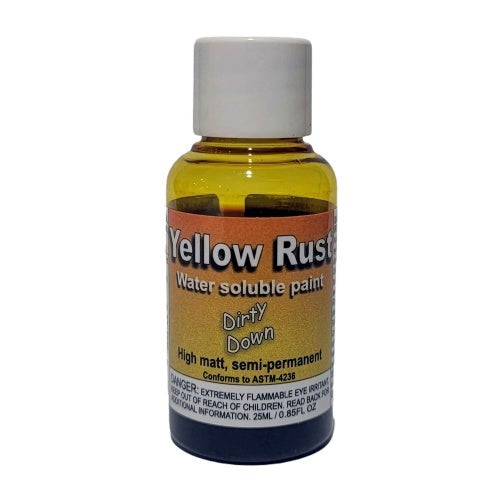
Apply yellow rust paint in the same way as our normal rust paint, by brush or airbrush/sprayer. Use on its own or with normal rust effect paint. A single coat of yellow rust is light yellow shade but the shade darkens as more coats are applied. If several coats are applied the colour darkens to a shade similar to that of normal Dirty Down rust effect paint. IMPORTANT: Before use: Thoroughly shake the pot with the ball bearing rattling and thoroughly stir inside the pot with an old brush until all the lumps are gone. For best results the pot and the surface being painted should be at room temperature or a little warmer. The colour could dry dark if the surface is too hot or too cold. Tip: keep the pot in your pocket against your skin for an hour before use and shake regularly with the ball bearing rattling. Repeatedly stir and shake the pot until all lumps have gone. It is very difficult to remove the lumps if the liquid is cool or cold. Usage Instructions: Always clean the brush in water or methylated spirit straight after use (not white spirit). Do not let the paint fully harden onto brush. The mixture will settle on the bottom of the pot. Thoroughly shake with the ball bearing rattling and stir before each and every use. Use paint straight from the pot. Replace the lid quickly during use to prevent the liquid from evaporating. Evaporation with cause the liquid to thicken and the colour to darken. To lighten shade add a little water. Do not add water into the paint pot, it’s best tip a little paint into a separate pot and then add small amounts of water. Or to lighten the colour, apply paint to a surface with a damp/wet brush. Or, after painting dab the wet or dry paint with a wet brush. Ensure surfaces are clean, dry and grease free. Test the paint on hidden surfaces before use to ensure compatibility and adhesion. Only apply to non-porous surfaces such as plastic and metal. Do not apply to porous/absorbent surfaces such as bare timber or paper. The paint can be applied to painted surfaces, but test first. If the effect does not form, try first sealing the surface with varnish. Our paint is water soluble and the effects of painting will be lost by washing in water or handling with wet hands. Do not expose paint to rain or splashing with water. Looks best when applied to a rough surface. To fill dents and grooves in surfaces, first cover the surface with paint, and then wipe the paint off the raised areas with a damp cloth (at an angle to the grooves), leaving some of the paint trapped. The wetter the cloth, the more paint removed. When dry, avoid scuffing/scratching the finished paintwork. For the best results it’s best to practise the different techniques listed below: To darken the shade apply more coats. Allow each coat to fully dry before applying another. Any number of coats of paint can be applied over the top of each other. For a broken, patchy effect apply to small areas/patches at a time and allow to dry – more in some areas, less in others. The shade will vary depending on the quantity applied. A thick coat of paint will dry a darker shade, and a thin coat of paint will dry a lighter shade. Further variations in shade can be created by dabbing a damp or wet brush, cloth or tissue onto the painted surface and then leaving to dry. As the water dries, the paint separates into shades of light and dark. The more water used, the greater the effect. This technique can be used after the paint has dried or while it is still wet. Another option is to simply splash water onto the paint and leave to dry – without dabbing. For a very dark shade, decant a small amount into a separate pot and allow the paint to evaporate. The more the paint evaporates, the thicker and darker the paint gets. Brush Application Dip the brush and immediately apply to the surface. For a patchy effect dab the paint onto a surface and keep dabbing in the same place until the paint dries. Any number of coats can be applied in this way. For a more even effect paint an even coat onto a surface. A dry, damp or wet brush can be used A different effect is obtained depending on whether a soft or stiff brush used to apply the paint. Fine Soft Brush: For very detailed work. Apply a small amount to the brush and apply directly to the surface. Larger Soft Brush: For apply larger amounts to larger areas. For a darker shade apply larger quantities and for lighter shades apply smaller quantities. Stiff Brush: Very light shades can be obtained by dabbing a very small quantity of paint onto a surface using a stiff brush. Allow the paint to dry slightly on the brush for a very light effect, similar to the “dry brushing” painting technique. Cloth/Tissue Application Pour on a cloth or tissue and dab onto a surface and keep dabbing in the same place until the paint dries. For a light shade apply a small amount at a time. For a darker shade apply a larger quantity. Spray Application Spray paint onto a surface straight from the pot using an air brush or pressure pot spray gun. Clean air brush immediately after use. These paints are water soluble and can be wiped off surfaces in two ways (even when fully dry): Using a damp cotton bud. Only dampen one end of the cotton bud. Wipe paint with the damp end first, and then with the dry end. The wetter the cotton bud, the more paint is removed. Using a sheet of kitchen roll (absorbent paper towel). First apply the paint onto the panels so that they are fully covered, and leave to dry. Flatter one end of a piece of kitchen roll, and dip this end into water. Remove most of the water from the flat end so that it’s only slight damp. This can be done by pushing the flat end against other dry pieces of kitchen roll. Gently press the damp flat end of kitchen roll against the dried paint, and twist the kitchen roll. Keep the kitchen roll in one place, do not wipe side to side across the surface. Some paint is left on the model and some removed. Some paint will have been wetted by the damp kitchen roll and will change shade to look darker. The wetter the paint gets, the darker the shade. Practice first to check how damp the kitchen roll should be and how much pressure to apply. Create different shades using water: Apply the paint to a surface and apply a small amount of water to the paint as it dries. This usually causes the colours to separate and dry different shades and more patchy. Water can be applied to the surface after the paint has fully dried or when the paint is still wet.
£7.80

It features a fully sculpted hard plastic handle, and incorporates a number of clever features for safety and convenience:– Fixed single slot blade barrel, ensuring perfect alignment– Ribbed shroud behind the blade, allowing safer downward pressure and maximum precision– Ergonomic handle to reduce hand fatigue, and prevent rolling on your desk– Back-weighted design, so it’s less likely to fall with the blade down– Blade changing thread recessed into the handle so the blade doesn’t loosen during use– Blade capThe Citadel Tools Knife also comes with a pack of six replacement blades in a container.
£20.50 £18.50
£12.00 £10.80
Subscribe to our emails